Welcome to our guide on installing safety ramps in pet housing! Whether you have a furry friend who's getting older or a small pet that needs extra help, this guide will show you how to create the perfect ramp for your pet's home. Safety ramps help pets access their housing more easily and reduce the risk of injuries. Let's learn how to make and install a custom safety ramp for your pet!
Key Takeaways
| Aspect | Details |
|---|---|
| Purpose | Improve pet mobility and safety |
| Materials | Plywood, wood preservative, non-slip surface, screws, nails |
| Key Steps | Measure and cut, treat wood, attach non-slip surface, secure to housing |
| Safety Considerations | Gentle slope, adequate width, non-slip surface, regular maintenance |
| Benefits | Reduced joint stress, increased independence, injury prevention |
Why Install Safety Ramps?
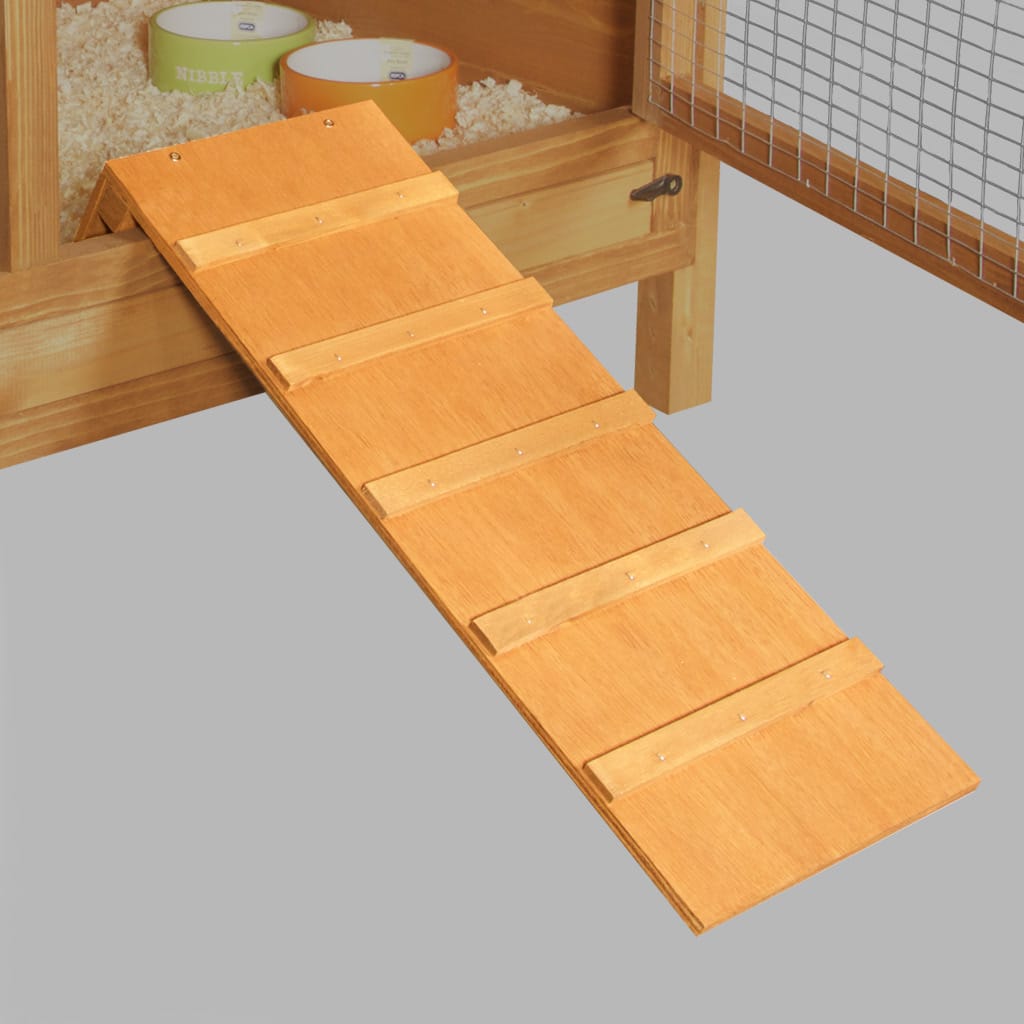
Safety ramps are important for many pets, especially those who have trouble moving around. They make it easier for pets to get into their homes and help prevent injuries from jumping or climbing. As pets get older or if they have health problems, using steps or jumping into their house can be hard and dangerous. The Help Me Up Rabbit Hutch Ramp shows how a simple ramp can make a big difference for your pet. By adding a ramp, you're making your pet safer and helping them stay independent, which is good for their health and happiness.
Remember, good materials are important for your pet's safety. The Help Me Up Ramp uses 10mm WBP plywood, which is strong and can handle weather. When choosing your materials, think about how big your pet is and where the ramp will be. For outdoor ramps, use materials that can handle rain and sun.
Step-by-Step Installation Guide
Chicken Coops
Safe, sturdy homes for your hens
Rabbit Hutches
Cosy shelters for your bunnies
Dog Kennels
Weather-resistant homes for dogs
Pet Accessories
Feeders, toys, and more for your pets
1. Measure and Cut
First, measure how high your pet's house is from the ground. To make a safe ramp, make it 2.5 times longer than this height. For example, if the height is 40cm, your ramp should be at least 100cm long. Cut your plywood to this size. Make sure it's wide enough for your pet to walk on comfortably – about 20cm for small pets like rabbits and guinea pigs, and wider for bigger animals. You might want to add an extra 5-10cm to the width for side rails.
2. Treat and Prepare
Put a pet-safe, water-based wood preservative on the ramp to protect it from weather. This is really important for outdoor houses. Put on at least two coats, letting each one dry before adding the next. After it's dry, sand the surface lightly to make sure there are no splinters that could hurt your pet's paws. Pay extra attention to the edges and any cut areas. For even more protection, you could add a pet-safe varnish on top of the preservative to help protect against moisture and wear.
3. Attach and Secure
Now it's time to add the non-slip surface. This is really important for your pet's safety, especially when it's wet. You can use outdoor carpet, rubber matting, or even anti-slip tape. Make sure to attach it firmly with pet-safe glue or small nails. If you use nails, make sure they're completely flat against the surface so they don't hurt your pet. Check that there are no loose edges that your pet could chew on or get caught in. For extra grip, you could make a pattern of horizontal lines or grooves on the ramp before putting on the non-slip material.
Finally, attach the ramp to your pet's house. You can use hinges to make it fold up, or create a simple hook system so you can take it off easily. If you use hinges, make sure they're strong enough to hold your pet's weight and won't pinch their paws. For a hook system, make secure attachment points on both the ramp and the house. Make sure the ramp is stable and secure before letting your pet use it. Test it with some weight to make sure it doesn't wobble or move.
Safety Tips and Considerations
When installing your DIY safety ramp, keep these important points in mind to keep your pet safe and comfortable:
- Make sure the ramp is wide enough for your pet to turn around comfortably. This is especially important for bigger pets or those who have trouble moving.
- The slope should be gentle – a ratio of 1:12 (1 unit up for every 12 units long) is good for most pets. For older or very small pets, make it even gentler, like 1:16 or 1:20.
- Add small side rails if you're worried about your pet falling off. These can be made from thin strips of wood and should be at least 5cm high.
- Check the ramp regularly for wear and tear, especially the non-slip surface. Fix or replace any damaged parts right away.
- Train your pet to use the ramp slowly, using treats and encouragement. Start with short sessions and gradually make them longer.
- For longer ramps, consider adding small platforms or resting areas so your pet can stop and rest while climbing.
- Make sure the ramp is securely attached at both ends so it doesn't slip or fall.
- For outdoor ramps, try to provide some cover to protect from rain and make it less slippery.
Remember, while making your own ramp can be fun, sometimes a professionally made product like the Help Me Up Ramp can save time and be safer. It's designed to hold pets up to 400 pounds and comes with a sturdy, non-slip surface. If you're not sure about your DIY skills or have a very large or heavy pet, a professionally made ramp might be the best choice.
Benefits of Installing a Safety Ramp
By installing a safety ramp in your pet's housing, you're helping your pet in many ways:
Weather Protection
Shields pets from rain and cold British weather
Insulation
Keeps pets warm in winter and cool in summer
Personal Space
Gives pets a safe, private area to relax
Easy Cleaning
Designed for quick maintenance and hygiene
These benefits are especially important for older pets or those with mobility issues. A good ramp can really improve their daily life and make them happier. For pets with conditions like arthritis or hip problems, being able to move without pain can make a big difference in how they feel.
Maintenance and Care
To keep your DIY safety ramp safe and working well for a long time, you need to take care of it regularly. Here are some tips for keeping your ramp in good condition:
- Clean the ramp often with pet-safe cleaning products. For wooden ramps, use mild soap and water and avoid strong chemicals that could damage the wood or hurt your pet.
- Check for any loose screws or nails and tighten them if needed. This is especially important after lots of use or bad weather.
- Replace the non-slip surface if it starts to wear out. Look for areas that are smooth or slippery and fix them right away to prevent accidents.
- For outdoor ramps, put on new wood preservative once a year. This will protect against rot, mold, and weather damage, making your ramp last longer.
- Check the places where the ramp attaches regularly to make sure they're still secure and stable.
- In winter, clear any snow or ice from the ramp to prevent slips and falls.
- Check wooden ramps for any splinters or rough spots and sand them smooth to protect your pet's paws.
- If you notice any damage or if the ramp is getting weak, replace it right away to keep your pet safe.
By following these care tips, your DIY safety ramp will stay safe for your pet to use for a long time. Taking care of the ramp regularly not only keeps it safe but also makes it last longer, making it a good investment in your pet's well-being.
Conclusion
Installing a safety ramp in your pet's house is a kind and practical way to make their life better. It shows that you care about your pet's comfort, safety, and long-term health. Whether you build your own or buy one like the Help Me Up Ramp, you're taking an important step in caring for your pet. Safety ramps do more than just make things convenient – they help your pet's physical health, emotional well-being, and overall happiness.
Remember, every pet is different, so watch how your pet uses the new ramp and make changes if needed. Some pets might start using the ramp right away, while others might need some encouragement and training. Be patient and supportive while your pet gets used to it. With a little patience and the right setup, you'll soon see your pet confidently using their new ramp, enjoying more freedom and comfort in their home.
For more tips on pet care and housing solutions, check out our blog on pet care. We cover lots of topics from food to making your pet's environment better, all to help you take the best care of your pets. Happy ramp building, and here's to many years of happy, healthy pets!


